Kevin Xiao’s Cosplay

Happy Maker Monday! This week we interviewed Kevin Xiao, a third-year CompE major and the president of the Anime O-Tekku Club here at Tech. Kevin and the club attended Anime Weekend Atlanta in costumes they made themselves at the Invention Studio.


Anime O-Tekku Club at the convention


Q: Describe your costume.

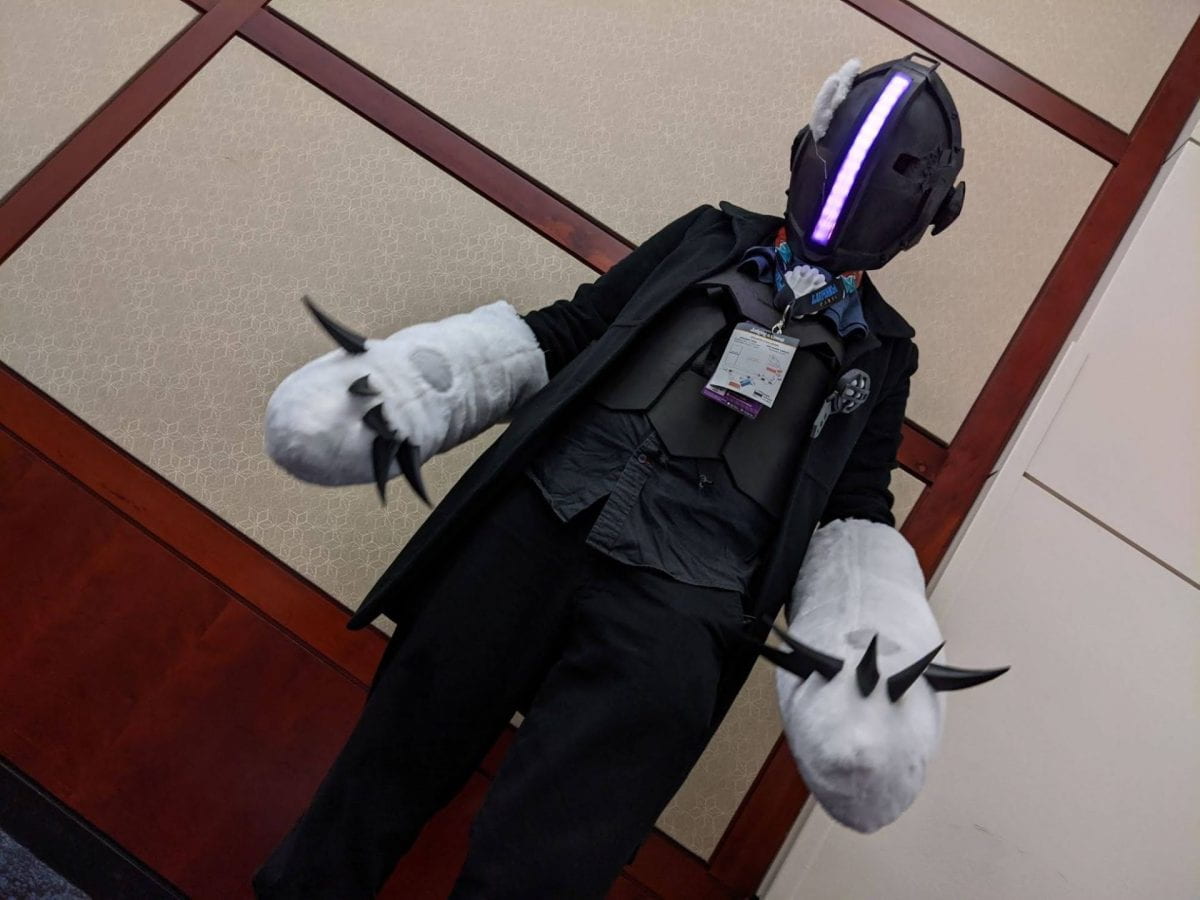
A: My costume is the character “Bondrewd” from the movie Made in Abyss: Dawn of the Deep Soul.


Q: How did you create your costume?

A: The components of the helmet are all 3D printed. I wired electronic lights to it for the purple strip in the middle, and the arms are all hand-sewn.


Q: What did you learn throughout this process?

A: I’ve learned a lot through cosplaying. 3D modeling and printing, sewing,  and electronics are important for a good costume. I have plans for an even larger cosplay for next year.

Photo of Kevin’s “Bondrewd” costume


Kevin’s other cosplays are on his Instagram @kosplaykevin. Keep up the creativity, Kevin!

Evan Walters’ Golden Ratio Cutting Board

Happy Maker Monday! This week we spoke with Evan Walters, a 4th-year ME major who made this incredible wooden cutting board! Evan’s design was based on the Golden Ratio.

Meet the Maker: Evan Walters


Q: Why did you decide to create a cutting board?

A: It’s a cutting board for myself because, while I’ve made a couple by now as gifts, I realized I had never made one for myself.

Photos of Walters’ board


Q: What inspired your design? 

A: I was inspired by the Golden Ratio because I didn’t have a ton of wood to work with but I wanted to have a creative design. Being an ID Minor, they often mention trying to incorporate the Golden Ratio into designs and I thought it was a creative and fun twist for my design.

The Fibonacci spiral: Approximating the harmonious golden ratio | Download  Scientific Diagram

Golden Ratio, based on the Fibonacci Sequence


Thanks for speaking with us, Evan!

Throwback Thursday with The Chain Train

Happy Throwback Thursday! This week we interviewed Christopher Song of The Chain Train. This team worked on developing a tool-less chain tensioner to improve TTI’s RYOBI One+ Chainsaws.


Q: Could you give us a brief description of your project for those who may not know about it?

A: TTI wanted us to redesign the toolless chainsaw tensioning mechanism on their Ryobi ONE+ chainsaw. There were complaints about the tool-less tensioner not providing a sufficient tensioning range and not having as much tensioning precision as the tooled tensioner variant. We needed to design a tensioning mechanism that tensions the chain more effectively than the current toolless chain tensioner, that could provide user feedback, and could be retrofitted to the current chainsaw body. Ideally, this tensioner should incorporate the reliability of the tooled tensioner, but incorporate the ergonomics of the current tool-less chain tensioner.


Q: Where did you first draw inspiration for the idea of the “Tool-less Chain Tensioner design,” for your Capstone Design Project?

A: A lot of our initial inspiration came from analyzing tensioning mechanisms from other chainsaws and other devices, such as automatic tensioners found in bikes and cars. One general theme we noticed was that most chainsaws tension their chains by moving the guide bar by rotating either a knob or a screw, which prompted the use of a scotch yoke mechanism.


Q: What was the design process like and how did you and your teammates come together to finish your project?

A: We first delegated specific roles for each of the team members that played to their own strengths. This helped to evenly distribute the workload throughout the whole semester. Our process was as follows: concept ideation, testing/data collection, hand calculations, FEA simulation, 3D print prototyping, metal prototyping. We first came up with a few design concepts to carry out the basic functions of a toolless chain tensioner and created models in CAD with various combinations of our ideas. After, we collected load force samples to determine the worst-case scenario stress loads that could be applied to our design. In addition to hand calculations we also used FEA simulations to validate our theoretical calculated stresses on the design parts. We then move to fit testing and prototyping with 3D printed parts which served as trials before final metal parts. Having each person assigned to a specific role or specialty knowledge area really helped our team and project flow smoothly.


Q: What were some of the problems that you faced along the way and how did you overcome those obstacles?

A: During the concept ideation and testing phase, several group members had to quarantine which prevented us from gathering and fit testing the 3D printed parts. This prompted us to shift all hands on work to only engineering analysis work and research. This caused minor interruptions in the timeline; however, we were still able to manufacture multiple prototype iterations despite this.

Another issue that set back our timeline was the HIVE messing up and delaying multiple prints. Our progress heavily depended on these delayed parts, so we reached out to other makerspaces like the invention studio an Aero makerspace to try to get the parts printed ASAP. We explained the situation to TTI, and they offered to help print parts for us. Luckily, with and help from TTI and other makerspaces, we were still able to make the fit-test prototypes we wanted. From this, we learned to reach out to multiple resources simultaneously, and it is wise to have duplicate prints (just incase one turns out poorly).


Q: How did it feel to present your project virtually?

A: With the first few people that showed up to our online table, we were a little bit flustered. It was hard to see when someone had joined the table huddle, so someone had to constantly monitor the head count. We also talked over one another answering follow up questions. After the first couple people, we sorted out how to approach the follow up questions by having one team member vocally saying “I’ll take this” or redirecting by saying “I think [team member] can answer this.


Q: How did it feel to work with TTI and how did they help you with the creation of your project?

A: The TTI engineers who worked with us were very kind, knowledgeable, and a great resource to our group. We are very thankful for the engineers at TTI who guided us through this project and offered insight/advice. During our concept ideation phase, TTI helped us understand what kind of materials were realistic for this project, what design concepts would be more feasible, or the codes and standards that were applicable. The team was very nice; they went as far as to print some 3D parts for us and ship them to us when the on campus resources were slow and queued up.


Q: What do you think made your team successful in creating your project?

A: Members of the chain train have had prior design experience from participating on SCC teams and past internships which allows us to have a diverse skillset. The diverse skillset allowed each member to excel at what they do best, while helping to cover other members’ weak spots. With six people on our team, we also had a lot of different ideas a different point of views. By having so many POVs, we were able to come up with many ideas and really analyze the pros and cons of each idea in depth. Also, we had a great advisor and a ton of help from the engineers at TTI.


Q: Do you have any advice for future teams?

A: Aim high and have checkpoints/a clear direction that the team is heading towards. This allows the team to finish a bulk of the before the deadline. For example, our team wanted a fully working developed design that was ready for production by the end of the semester. Although we could not achieve this goal, our timeline allowed us to finish a working prototype with a mix of metal and 3D printed parts. The design still needs improvement, but our work will help TTI fast track the next design for their next toolless chain tensioner.

When meeting with the sponsor, prepare a short weekly/ bi-weekly presentation for the engineers. This keeps meetings short and informative. During the meeting, assign a designated note taker to record any comments/ feedback from the sponsor.

Throwback Thursday with Flightie Talkie

This week we spoke with Baran Usluel of Flightie Talkie, a Capstone Design group sponsored by the 3D Ranger Battalion, 75th Ranger Regiment to create a speakerphone payload for drones to communicate.

Q: Could you give us a brief description of your project for those who may not know about it?

A: Drones are used by the military, law enforcement and other industries to remotely navigate and surveil hazardous situations. However, there are no available solutions on the market for two-way communication with people around a drone. Our project was to design a long-range speakerphone payload for the FLIR SkyRaider R80D.

Q: Where did you first draw inspiration for the idea of the “Speaker Integration with SUAS,” for your Capstone Design Project?

A: The project was proposed and sponsored by the 3rd Battalion, 75th Ranger Regiment of the US Army. They needed a solution to easily communicate with civilians or troops in combat zones through their existing unmanned aircraft.

Q: What was the design process like and how did you and your teammates come together to finish your project?

A: The design process firstly started with defining and understanding the problem, doing all the relevant research, and then moving on to concept ideation and selection. After selecting our initial concept and starting design, we discovered new constraints that took us back to the drawing board and brought us to our final design. Our ME and ECE members worked as two subteams, designing and validating the relevant subsystems mostly separately. We relied on prototyping, experimental tests and theoretical analyses to validate the engineering requirements.

Q: What were some of the problems that you faced along the way and how did you overcome those obstacles?

A: The biggest challenge for the team was the fact that we did not have hands-on access to the drone, for security and inventory reasons. There was also limited information available online as it is a defense industry product. We circumvented this obstacle by coordinating with our sponsor representatives to collect measurements of the drone, which we used to make CAD and low fidelity mockups that we leveraged in our design process.

Q: How did it feel to present your project virtually?

A: Presenting our project virtually at the capstone expo was certainly more comfortable because we were at home, but I believe it made it more difficult to connect with the judges and have natural conversations. I also felt like the ability to walk around and look at posters as in an in-person expo was lacking, although the Gatherly platform was definitely an improvement over typical web meetings.

Q: How did it feel to work with the 3D Ranger Battalion, 75th Ranger Regiment and how did they help you with the creation of your project?

A: We were fortunate to work with the Rangers on such a high-impact project. Simply put, it was really cool! They proposed the project, gave us guidance on the problem as needed, and arranged for us to visit Fort Benning to test our prototype.

Q: What do you think made your team successful in creating your project?

A: Our team members had a variety of strengths, so we were able to divide responsibilities, work individually and communicate well. We cared about the project and wanted to produce something we were proud of. Put together with helpful advisors and sponsor representatives, this set us up for success.

Q: Do you have any advice for future teams?

A: The initial project planning stages before you get to designing are more useful than you think; they can save you a lot of time later if done right. And once you get to the design stage, the semester will fly by so try to make sure you are constantly making progress! Finally, make sure each team member is clear about what is expected of them; overcommunication is better than a lack of communication.

Project Image

Thanks Baran for speaking with us this week!

Sadie Moxley’s Ping Pong Ball Machine

Happy Maker Monday! This week we interviewed Sadie Moxley. Sadie is a Prototyping Instructor (PI) at the Invention Studio, but when she’s not on shift, she’s still in the studio working on her ME 2110 project. Sadie’s machine must meet the guidelines she was provided, such as being able to roll ping pong balls, collect them, and shoot them accurately into a bucket. If you’re interested in becoming a PI like Sadie, stop by the Invention Studio Monday-Friday 11am-4:45 pm and ask a PI with an armband for help!

May be an image of indoor and text that says 'Invention Studio Workbench4 WLOMAN'

May be an image of indoor


Throwback Thursday with the QuaranTEAM

Happy Throwback Thursday! This week we interviewed Harrison Kollias of the QuaranTEAM, which developed the fluid controls system of ResonanceDx’s rapid COVID-19 diagnostic test.

Q: Could you give us a brief description of your project for those who may not know about it?

A: We’ve spent last semester working with our sponsor, ResonanceDx, to develop a brand new, innovative infectious disease diagnostic test system. This new system will enable accurate test results to be delivered to the patient within 5 minutes, much faster than any other test on the market. Due to the pandemic, ResonanceDx’s focus shifted to meeting this goal specifically for COVID-19 diagnostics. Our team was responsible for the development of the fluid control system for a test cartridge used in this system.

Q: What was the creation process like?

A: Our team worked well with each other by evaluating each other’s strength and then clearly defining roles for each member of the team. The creation process went very smoothly as a result and our team never had any issues with meeting deadlines.

Q: What were some of the problems that you faced along the way?

A: Teamwork was never an issue for us, but one of the more prominent design challenges for the system was creating a way to move fluid without having powered electronics within the fluidic system. Our solution incorporated converting rotational motion of a motor into linear motion in a syringe to pump the sample fluid through the fluidic channels. This provided for a simple control scheme that only required the powered rotation of 2 motors to control the entire fluidic system.

Q: What do you think made your team successful in creating a fluidic package for Covid-19 rapid diagnostic tests?

A: Our team worked hard to understand and define the problem as early as possible so that we could start designing and prototyping very early in the semester. A design will be more successful with more iterations that can be evaluated. 

Q: Do you have any advice for future teams?

A: Define goals early, stay as organized as possible, and communicate constantly. There are no shortcuts.

Throwback Thursday with Team T.A.K.E.O.F.F.

For this Throwback Thursday, we interviewed Sebastian Delgado, a member of Team T.AK.E.O.F.F. Sebastian’s team helped design their “High School Startup Project,” where they created a plan to help teach students and teachers about the engineering field through the process of building a drone. With his teammates Teja Huggins, Nicole Catanzariti, Michael Benben, Maria Jose Serrato Gutierrez, and David Ramsey, he was able to present during the virtual Fall 2020 Design Expo.

Q: Could you give us a brief description of your project for those who may not know about it?

A: We created a platform for high school engineering projects. Students will be provided with a DIY drone assembly kit to learn about how different components interact with each other. Additionally, they will be tasked with designing and implementing a delivery system on that drone to potentially be used in real world situations (medical deliveries, search and rescue, etc). We designed a delivery system prototype as an example of what the drone is capable of carrying. In order to assist the teachers and students throughout the learning process, we also provided 2 workbooks. They will teach students how drones work and will provide guidance in learning how to make additions to the drone (CAD, micro controllers, programming, 3D printing, etc.)

Q: Where did you first draw inspiration for the idea of the “High School Startup Project,” for your Capstone Design Project?

A: The team was very interested in creating a product that would help younger students learn and inspire them to become engineers. Additionally, we noticed that drones are a very exciting and growing product that would keep students interested and engaged.

Q: What was the creation process like and how did you and your teammates come together to finish your project?

A: The team was meeting regularly with representatives from the Fulton County Innovation Academy and Global Impact Academy to understand what type of project they were looking for. In these bi-weekly meetings, the team would update the sponsors with project progress. Additionally, we did a lot of research on existing drone project platforms geared towards high school students to learn about what was successful and what wasn’t. In order to complete the bulk of the work, the team was split into 2 “sub-teams”. Half of us were focused on creating the workbooks and writing the curriculum for the schools, and the other half of the team was focused on the physical design of the drone and drop-off mechanism. We were in constant communication as a team, so everybody knew what was going on at all times. Additionally, we would have frequent team meetings so that everybody was prepared to meet with the sponsors.

Q: What were some of the problems that you faced along the way and how did you overcome those obstacles?

A: It was tough to present project updates with the sponsors without being able to meet regularly in person. In order to make virtual meetings as productive as possible, short PowerPoints were created for each meeting. If physical additions needed to be shared, somebody would bring the drone up to the camera and zoom in on specific components. Also, CAD models were created and presented by screen-sharing to show how small components functioned. At the beginning of the design phase we were focused on trying to design a drone from scratch and noticed that would have been incredibly time-consuming and inefficient to the ultimate goal of creating a project that teaches high school students. We decided it was more worth our time to choose a DIY kit off-the-shelf and focus on having students focus on designing/programming additions to the drone instead of just reading through our engineering models and drawings.

Q: How did it feel to present your project virtually during this pandemic?

A: It was a little difficult because it’s hard to use gestures to present points on the project. You can’t really point at things very easily, or show how something moves. In order to prepare for these, a lot of videos and short animations had to be prepared in case questions were asked about specific components.

Q: What do you think made your team successful in creating a model to educate students and teachers alike in the engineering field?

A: We believe that our project was successful because it was created for a big range of experience levels. The provided workbooks are perfect for students/teachers who have no idea how drones work, and for those who know how drones work but don’t know how to make additions to them. The workbooks combined with the open-ended challenge of creating a drone delivery system allow for students and teachers of all drone experience levels to learn and participate in our project model.

Q: Do you have any advice for future teams?

A: Stay on top of the school work (reports, presentations, etc) needed for the capstone class. It is very easy to focus on making progress in designing a product, so a lot of teams get stuck having to cram a 30 page report into a few days of work. As your team makes progress in certain components of the design process go ahead and start creating the figures needed for the report and write a couple paragraphs about it.

Project Image