
#
# Publish ADC data over ROS.
#
# One example of visualizing the data:
# rxplot /arduino/ADC/data[0] -b 15 -r100 -p5
#
#


import serial

import roslib; roslib.load_manifest('hrl_fabric_based_tactile_sensor')
import rospy
from hrl_msgs.msg import FloatArray


def setup_serial(dev_name, baudrate):
    try:
        serial_dev = serial.Serial(dev_name, timeout=1.)
        if(serial_dev == None):
            raise RuntimeError("robotis_servo: Serial port not found!\n")

        serial_dev.setBaudrate(baudrate)
        serial_dev.setParity('N')
        serial_dev.setStopbits(1)
        serial_dev.open()

        serial_dev.flushOutput()
        serial_dev.flushInput()
        return serial_dev

    except (serial.serialutil.SerialException), e:
        raise RuntimeError("robotis_servo: Serial port not found!\n")

def get_adc_data(serial_dev, num_adc_inputs):
    ln = serial_dev.readline()
    l = map(int, ln.split(','))
    if len(l) != num_adc_inputs:
        rospy.logwarn('Something fishy with the serial port.')
        serial_dev.flush()
        l = get_adc_data(serial_dev, num_adc_inputs)
    return l


if __name__ == '__main__':

    dev_name = '/dev/ttyUSB1'
    #dev_name = '/dev/ttyACM0'

    baudrate = 115200

    serial_dev = setup_serial(dev_name, baudrate)

    pub = rospy.Publisher('/arduino/ADC', FloatArray)
    rospy.init_node('adc_publisher_node')

    for i in range(10):
        ln = serial_dev.readline()

    rospy.loginfo('Started publishing ADC data')

    while not rospy.is_shutdown():
        fa = FloatArray()
        fa.header.stamp = rospy.Time.now()
        fa.data = get_adc_data(serial_dev, 6)
        pub.publish(fa)

    serial_dev.close()
Author: Ashwin Kumar Asoka Kumar Shenoi
arduino_code
/*
  Analog serial reader
  by Tom Igoe
  Language: Arduino/Wiring

  Reads several analog inputs and sends their values out.
  This application assumes you have analog sensors attached
  to analog inouts 0 through 5. At the simplest, you can
  hook up five potentiometers and it'll work fine.

  Created 24 May 2006

  --

  Modified by the Healthcare Robotics Lab, Georgia Tech
  11 July 2012

*/

// define the total number of analog sensors
// that you want to read
#define numberOfSensors 16

void setup() {
  // initialize the serial port:
  Serial.begin(115200);
  analogReference(EXTERNAL);
}

void loop() {
  // loop over the sensors:
  for (int thisSensor = 0; thisSensor < numberOfSensors; thisSensor++) {
    // read each sensor
    int sensorReading = analogRead(thisSensor);
    // print its value out as an ASCII numeric string
    Serial.print(sensorReading, DEC);
    // if this isn't the last sensor to read,
    // then print a comma after it
    if (thisSensor < numberOfSensors -1) {
      Serial.print(",");
    }
  }
  Serial.print("\n");
}
Manipulation with Whole-Arm Tactile Sensing
We are attempting to create a new foundation for robot manipulation that encourages contact between the robot’s arm and the world. A key aspect of our approach is that we assume the robot has compliant joints and whole-arm tactile sensing. To help promote the development of this approach, we have released the following open source code to control robot arms and open hardware that can cover robot arms with touch sensors. The code and hardware are products of our research funded by DARPA and the National Science Foundation (NSF).
Open Source Software: Control Robot Arms with Whole-Arm Tactile Sensing
Our open source software includes code to control robot arms to reach in clutter while keeping contact forces low, as described in our 2013 IJRR paper, “Reaching in Clutter with Whole-Arm Tactile Sensing”. It also includes code to interface with tactile sensor arrays and visualize their output, including all the code required to use our open hardware tactile sensors that we describe below. The code can be found via the following link: open source code to control robot arms with whole-arm tactile sensing
Documentation for the code can be found via the following link: documentation for the code
Open Hardware: Stretchable Fabric-Based Tactile Sensing
Our approach assumes that the robot arm has compliant joints and whole-arm tactile sensing (robot skin). Robots with compliant joints have become common in research and commercial products exist. Yet, relative to compliant joints, whole-arm tactile sensing for robots is rare and the technology is less mature. To support our research, we have developed tactile sensor arrays that are easy to fabricate, easy to use, and inexpensive relative to other large tactile sensing arrays. This has enabled us to quickly prototype tactile sensor arrays and give multiple robots whole-arm tactile sensing.Our main focus is not tactile sensor development and our sensors have limitations. However, we have found that they are sufficient to support our research and enable robots to perform useful tasks, such as reaching near the body of a user. We have released our sensors as open hardware with the intention of supporting researchers and hobbyists, although anyone is welcome to use our designs. We hope that the sensors and accompanying software will make it easier for people to build on our research.If you use our open-hardware tactile sensor design or wish to refer to it, please cite the following paper:
- Tactile Sensing over Articulated Joints with Stretchable Sensors, Tapomayukh Bhattacharjee, Advait Jain, Sarvagya Vaish, Marc D. Killpack, and Charles C. Kemp, World Haptics Conference (The 5th Joint EuroHaptics Conference and IEEE Haptics Symposium), 2013.
The main contributors to the development of this hardware were Dr. Advait Jain, Sarvagya Vaish, Jeff Hawke, and Prof. Charles C. Kemp. Dr. Advait Jain was the lead student for the first versions of the hardware for Cody and the PR2. Sarvagya Vaish was also a student contributor to the first versions. Sarvagya Vaish and Jeff Hawke were the main student developers of the advanced tactile array.
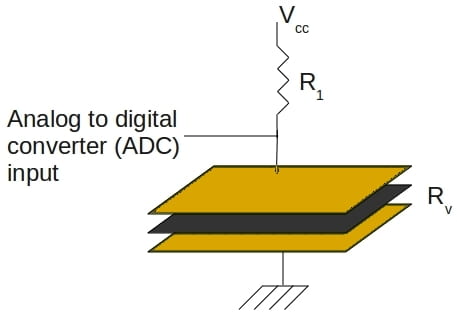
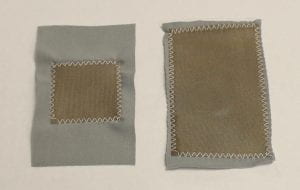
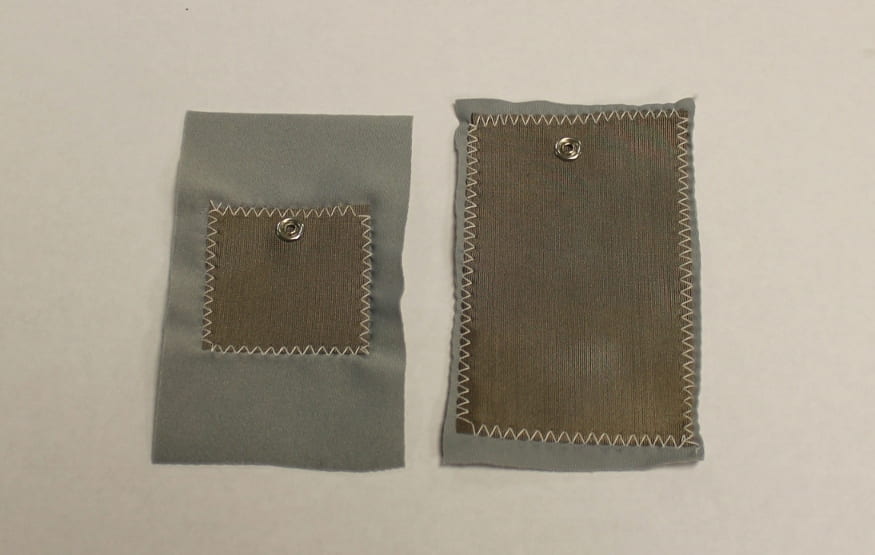
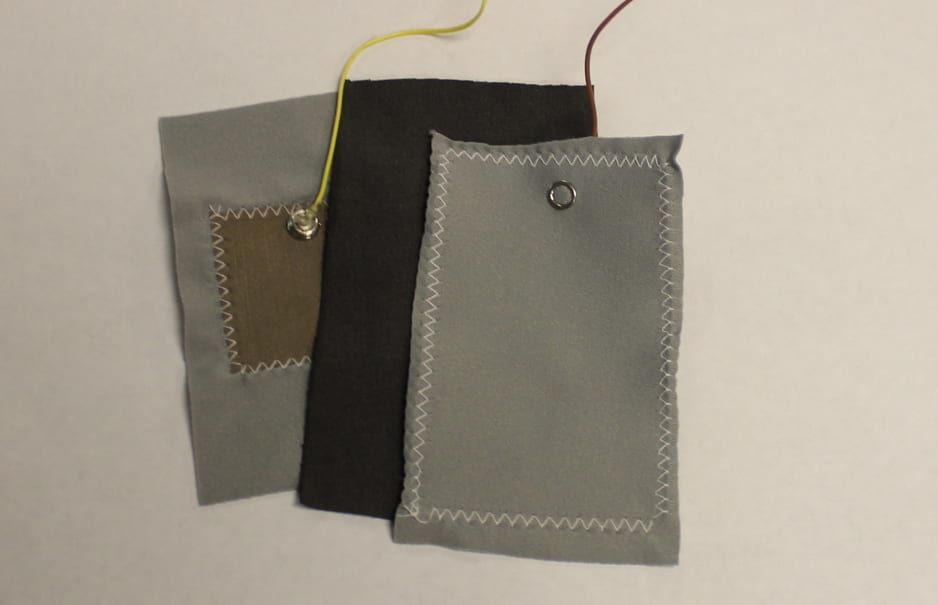
1. Basic Principle
A single sensing element or taxel (short for tactile pixel) consists of five layers of fabric. The layer in the middle is resistive fabric, which is sandwiched between two layers of conductive fabric. The taxel exhibits piezo-resistive properties. Specifically, the resistance between the two electrodes made of conductive fabric decreases when we apply a force on the sensor.

We use this taxel as part of a resistive voltage divider that we connect to the analog input pin of an Arduino board.
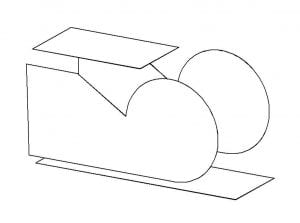
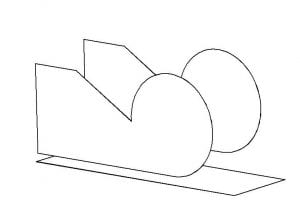
2. Steps to Make a Single Taxel
Having a picture or wiring diagram associated with each step would be geat.
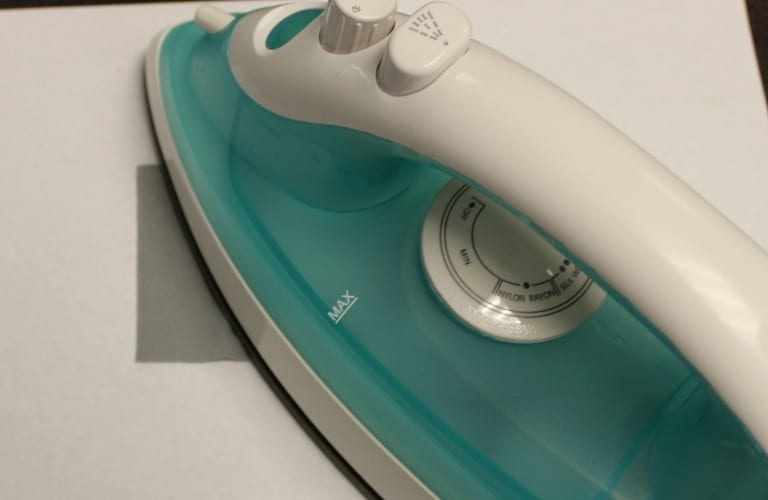
- Stick a patch of iron-on adhesive to the conductive fabric


- Cut two pieces of conductive fabric to serve as the two electrodes; one for the ground plane and the other for sensing area of the taxel
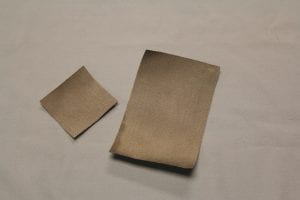
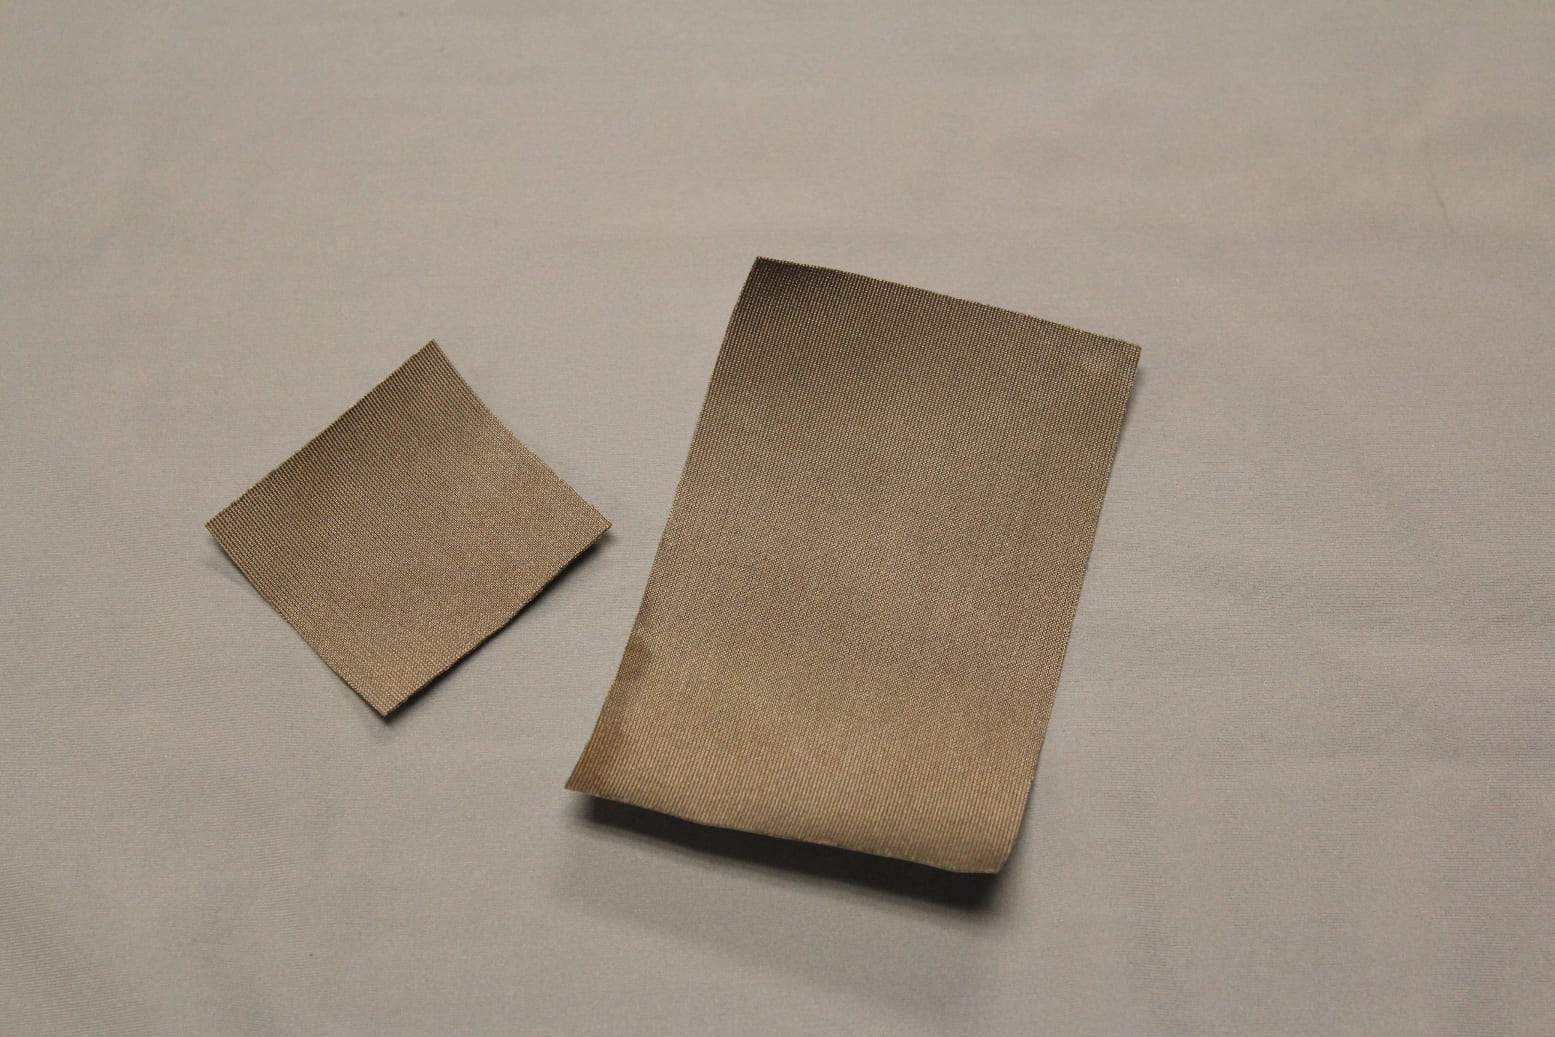
- Stick the conductive fabric to the non-conductive fabric using iron-on adhesive

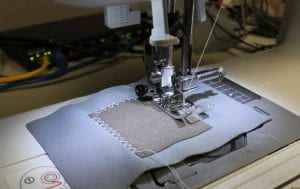
- Sew the edges using a zig-zag stitch. The glue will no longer hold the conductive fabric in place when the sensor stretches, but makes sewing a lot easier.


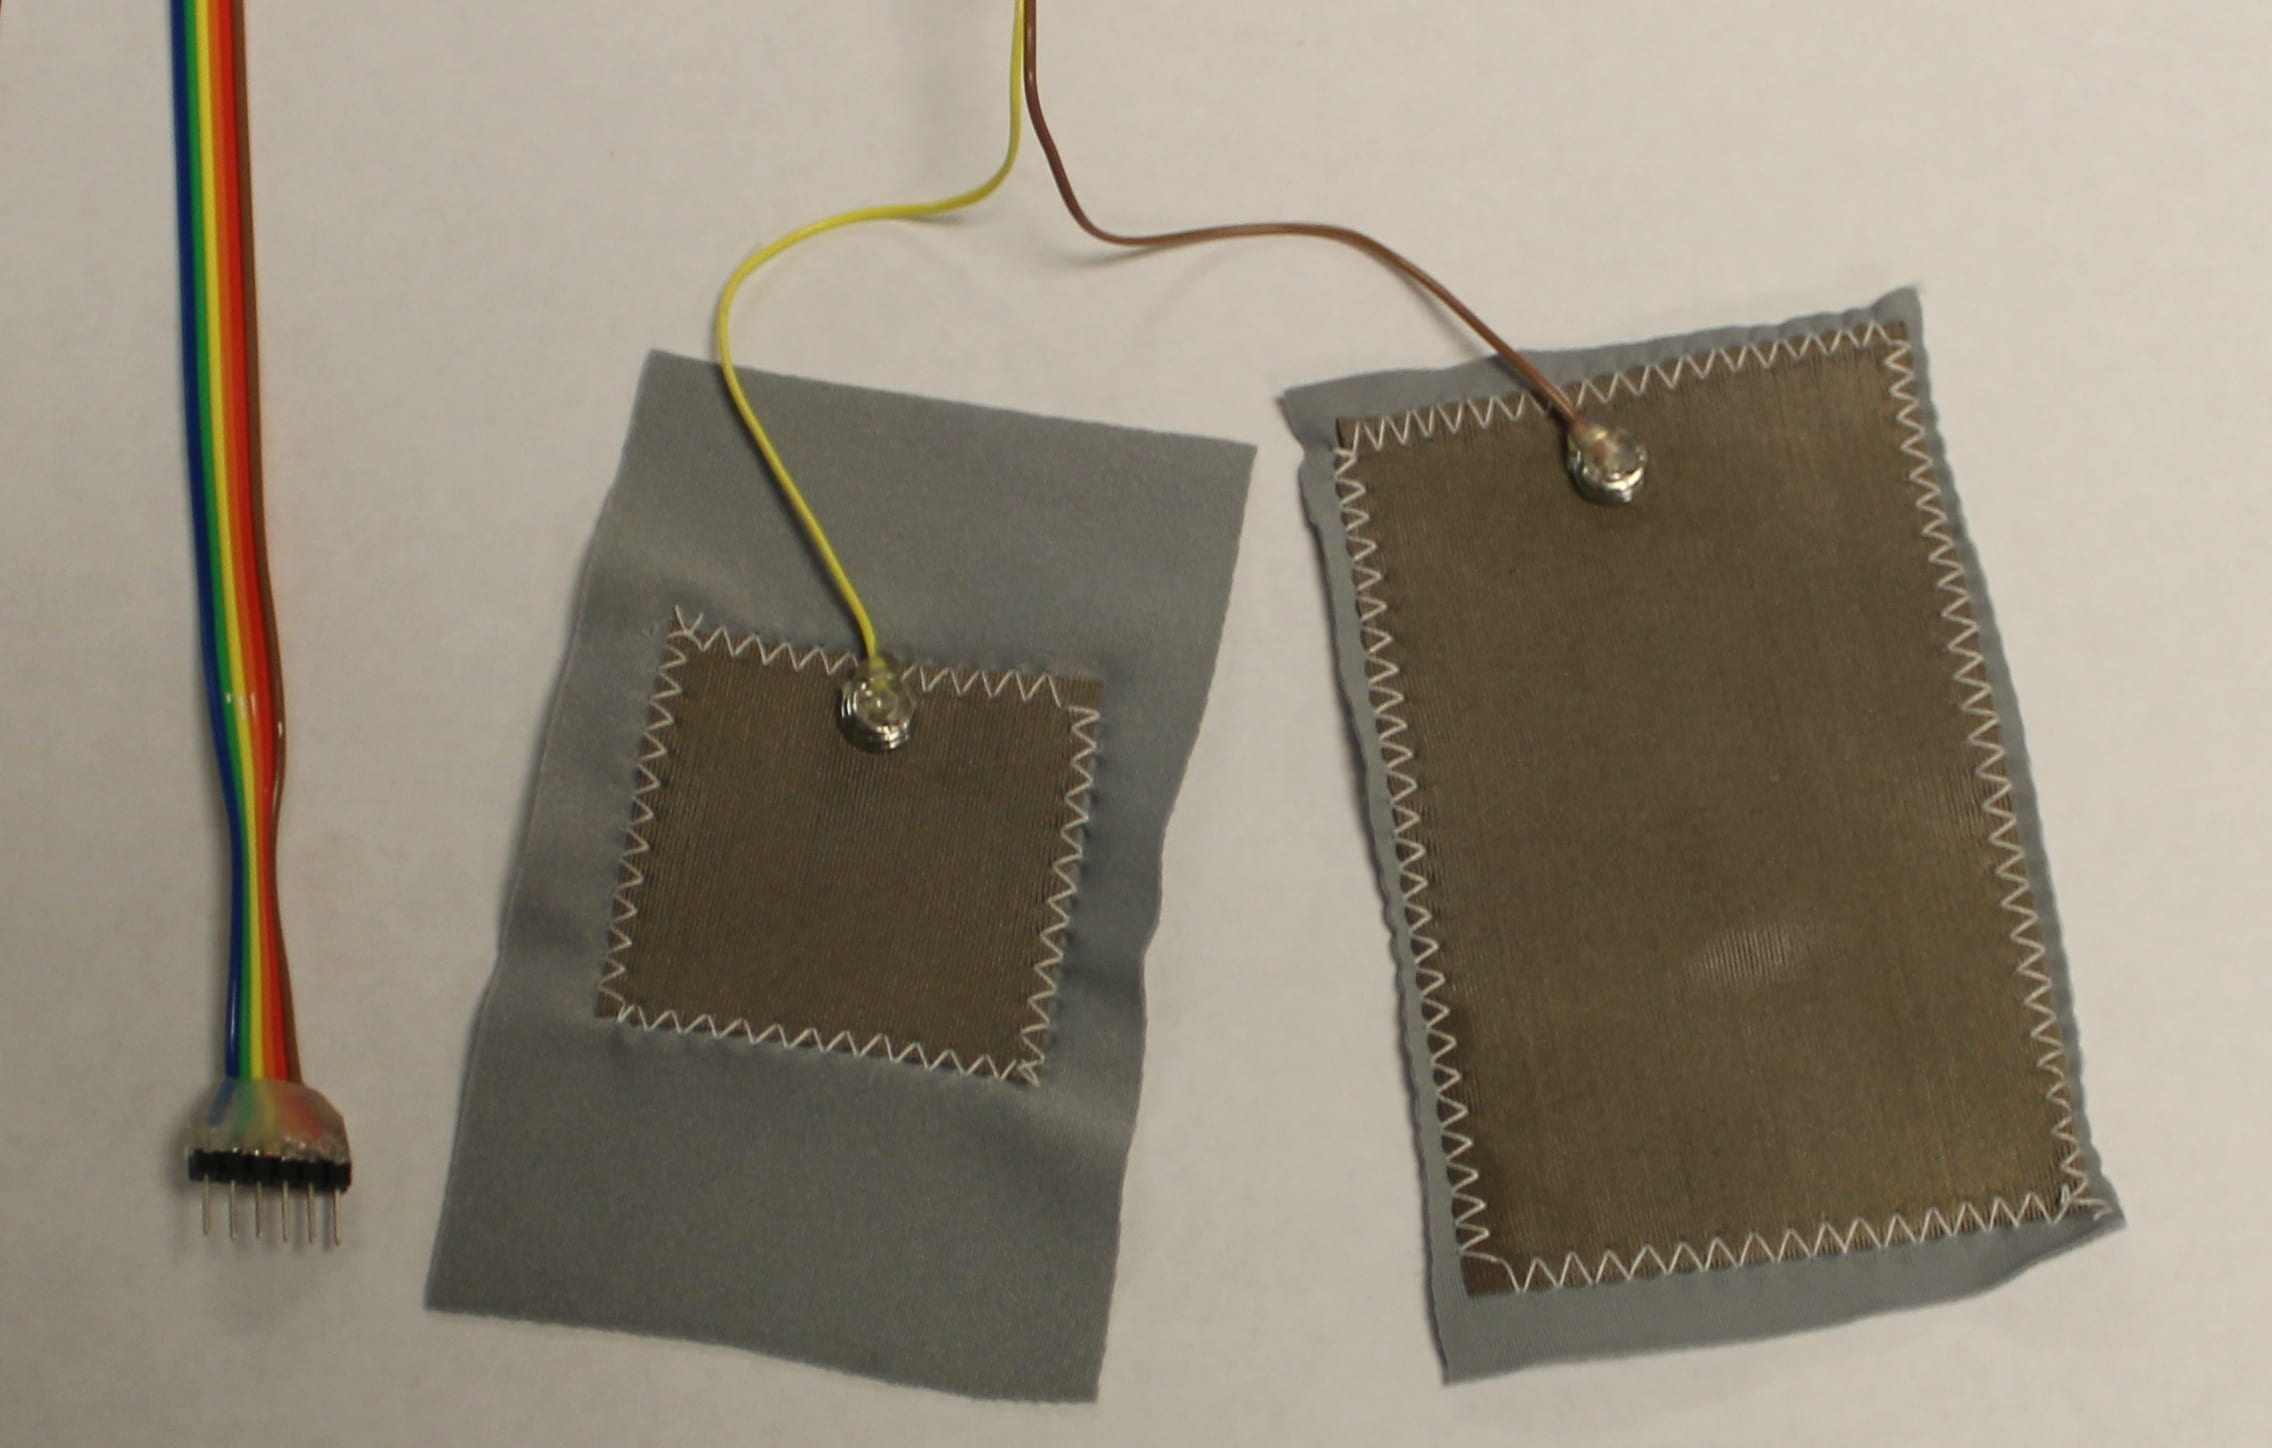
- Add female snap buttons to the two layers of conductive fabric. Connect wires to the conductive fabric using male snap buttons


- Put a layer of resistive fabric between the conductive fabric
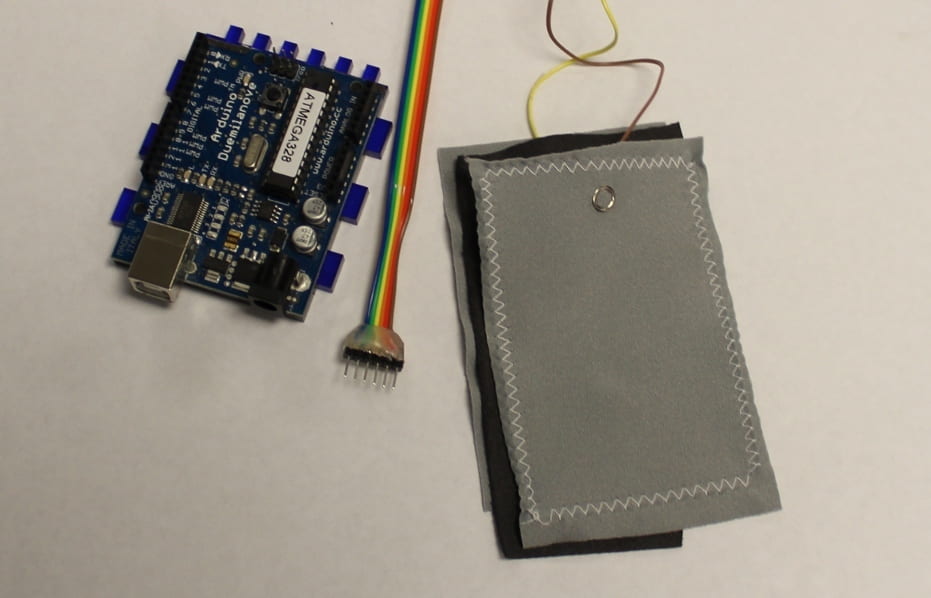
- Wire up an Arduino as shown in the schematic below and upload this code to it.


- Run this python script after starting roscore. Visualize using rxplot with the following command:
rxplot /arduino/ADC/data[0] -b 15 -r100 -p5
3. Making a Tactile Sensor Array
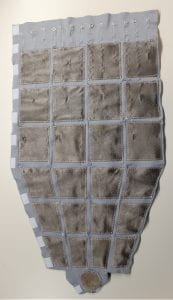
To make an array of tactile sensors, we change one of the layers of conductive fabric to have multiple discrete electrodes of the desired shapes and sizes. For example, 15 taxels that are rectangles of size 3cm x 5cm.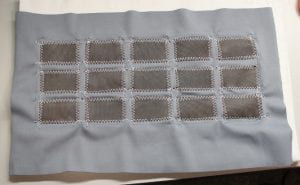
The second conductive fabric serves as a common ground for all the taxels.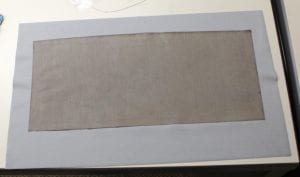
We also use a single sheet of resistive fabric on top of the common ground.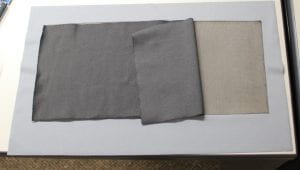
3.1 Simple Tactile Sensing Array
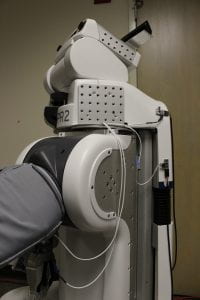
To create a simple array of tactile sensors, we connect the taxels to snap buttons using conductive thread (as shown in the picture below), or put the snap buttons directly on the taxel and use normal wires (method that we used for the PR2). We then connect them to an ADC port on an Arduino board.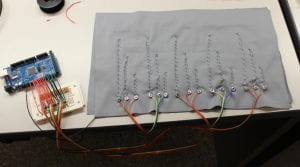
3.2 Advanced Tactile Sensing Array
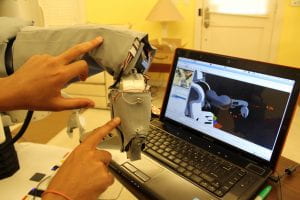
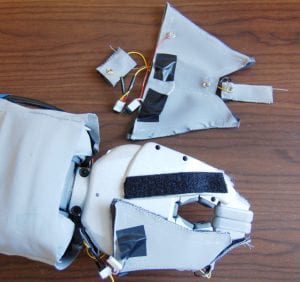
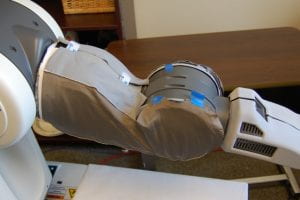
To create an advanced array of tactile sensors, we attach snap buttons on the taxels, but instead of connecting them to an ADC port on an Arduino board, they are connected to an 8-channel ADC chip mounted on the skin. The I2C communication protocol is used to connect the ADC chips to the Arduino. Up to four ADC chips can be daisy-chained and then a single set of Power, Ground, SCL, and SDL wires connect the ADC to the arduino. This helps reduce the wiring from the sleeves to the Arduinos.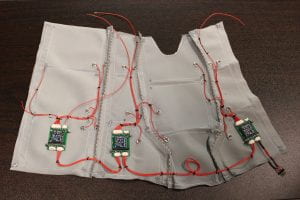
The ADC chip, bought from Sparkfun, is mounted on a custom PCB board. The PCB board also houses in-line pullup resistors and connectors. The entire PCB board is stitched on to the sleeve to prevent it from moving, as shown below. Since each ADC chip has 8-channels, eight wires branch out from the PCB, connecting to the snap buttons on eight different taxels.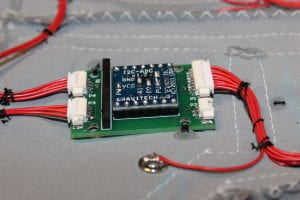
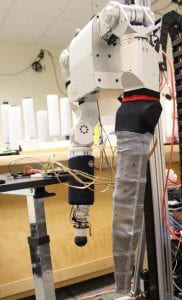
4. Cody Specific Design
4.1 Simple Taxel Layout
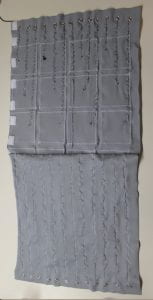
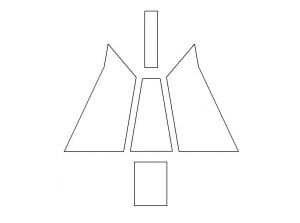
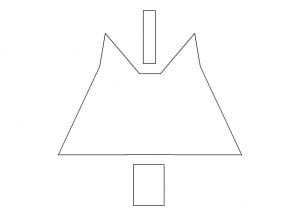
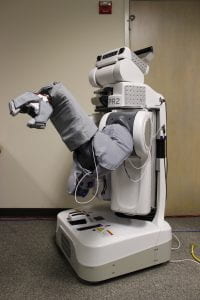
To cover Cody’s arm with our tactile sensors, we used one sleeve with 12 taxels in the forearm and 12 taxels in the end-effector region.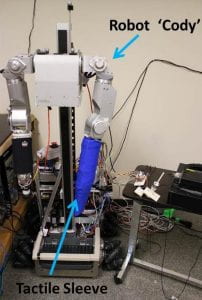
Design Files
Click here for all SolidWorks files.
The following are the images showing the taxel arrangement for Cody’s sleeve.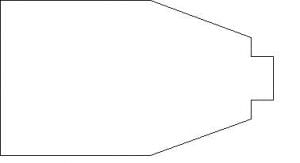


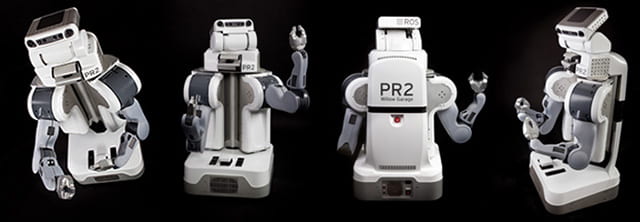
5. PR2 Specific Design
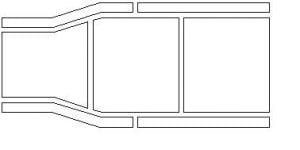
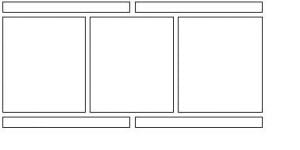
5.1 Simple Taxel Layout
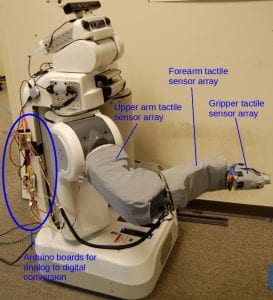
To cover the PR2 arm with our tactile sensors, we have different designs for the gripper (10 taxels), forearm (14 taxels), and upper arm (3 taxels).
Design Files
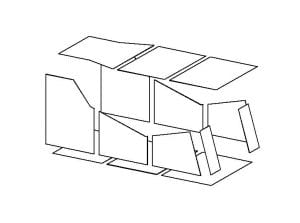
- The picture on top shows how the taxels are arranged
- The picture in the bottom shows how the cutouts for the ground plane, resistive fabric and outer and inner coverings are arranged.
Gripper
Click here for all SolidWorks files
Forearm
Click here for all SolidWorks files


Upper Arm
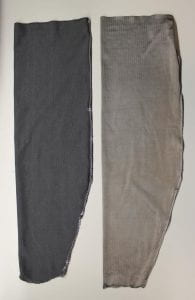
For the advanced taxel layout, the number of taxels on the gripper and the upper arm are not changed. The number of taxels on the forearm were increased to 22 taxels. This was done by adding two taxels on each of the four edges, thus adding a total of eight taxels.
Forearm Design Files
Click here for all SolidWorks files.
The following are the images showing the taxel arrangement for different sides of the forearm.

6. Raw Materials and Equipment
Here are the places where we purchased the different raw materials and equipment:
- Arduino boards
- Resistors
- Through Hole Resistors
- Resistor Array
- FTDI Cable
- Analog to Digital Converter (ADC) Chip
- Stretch Conductive Fabric: Silver plated 76% Nylon, 24% elastic fiber fabric purchased from LessEMF.
- Stretch Resistive Fabric: Knitted nylon/spandex fabric with proprietary conductive coating purchased from Eeonyx. We use the LG-SL-PA fabric with a surface resistance of 16kOhm/sq.
- Stretch Non-Conductive Fabric: McDavid Compression t-shirt for athletes. 80% nylon, 20% spandex and purchased from Amazon.
- Snap buttons – Open ring no sew snap fasteners: size 12(1/4″)
- Iron
- Glue gun
- Wire, connectors, headers: Digikey part numbers
- WM1722-ND
- WM1720-ND
- WM1726-ND
- WM7622TR-ND
- WM7620TR-ND
- WM7626CT-ND
- WM2320-ND
- Bread boards – Solderless Plug-in BreadBoard (3.3×2.2×0.3in)
- Iron-on adhesive
- Sewing thread
- Conductive thread – 2 ply
- Laser Cutter: Epilog Zing 16 to cut the fabrics.
- Sewing Machine: Brother CS6000i to sew the conductive fabric electrodes to the non-conductive fabric. We first tried out a Brother LS2125I machine, but found the higher-end computerized model made sewing a lot more convenient.
- Velcro
8. Support
This work was support by DARPA Maximum Mobility and Manipulation (M3) Contract W911NF-11-1-603 and National Science Foundation (NSF) Award IIS-1150157.
9. Acknowledgements
Our design is inspired by the rSkin project. We thank Hannah Perner-Wilson and Ian Danforth for helpful discussions.
We also thank Matt Carney and Aaron Edsinger from Meka Robotics for pointing us to the rSkin project.
10. Useful Links
Assistive Mobile Manipulation for Older Adults at Home
The Results Are In : PR2 Beta Program Recipients!
(Willow Garage Announcement)
Motivation
There is a growing need in society to enable older adults to remain in an independent living environment. Many older adults fear losing their independence and being required to move to an assisted living facility. From a societal perspective, it is cost-effective to support older adults’ preference to age in place. The economic implications of transitioning to full-time residential care settings are substantial, both to individuals and to society. Given current demographics, these costs are projected to increase exponentially. Older adults living in their own homes may be faced with situations in which there is a mismatch between the demands of their daily environment and their capabilities. These situations generally result from both increased demands (e.g., use of new medical devices) and deficits in the capabilities of the individual (e.g., age-related changes in cognition, perception, or movement control). There is great potential for robotics to support the needs of older adults — either directly or by supporting the activities of professional caregivers (e.g., nurses or physical therapists) who work in the homes of older adults.
Approach
The proposed research will consist of two closely integrated thrusts: one devoted to human-robot interaction and the other focused on software development. Both thrusts will be directed toward the development of assistive capabilities for the PR2 robot, with an emphasis on home care for older adults. These two thrusts are highly synergistic. The human-robot interaction (HRI) thrust will help ensure that the software development is closely connected to real-world needs, and the software development thrust will provide capabilities that both inform and enable cutting-edge studies of human-robot interaction.
An Interdisciplinary Team
Prof. Charlie Kemp, a leading researcher in the area of assistive mobile manipulation, will serve as the PI for the overall project and thrust leader for software development. Prof. Wendy Rogers, who is a leading researcher on technology and human factors for older adults, will be the thrust leader for human-robot interaction. They will lead a cross-disciplinary team of 17 researchers. Each of the four Co-PIs brings important expertise to the project. Prof. James M. Rehg is a leading expert in computer vision and machine learning, and is the Associate Director of Research in the Center for Robotics and Intelligent Machines. Prof. Andrea Thomaz is a pioneer in HRI and socially guided machine learning. Dr. Tracy Mitzner has almost a decade of experience conducting research on human factors and aging, with the goal of finding ways that technology can support aging. Brian Jones, the Director of the Aware Home Research Initiative, will provide supported access to the Aware Home, a free-standing home on the Georgia Tech campus that will house the PR2 for two 3-month periods so that we may conduct HRI studies and software evaluations in a realistic home environment.
Biologically Inspired Assitive Robotics
Videos : Inspired Robot, Canine Inspiration
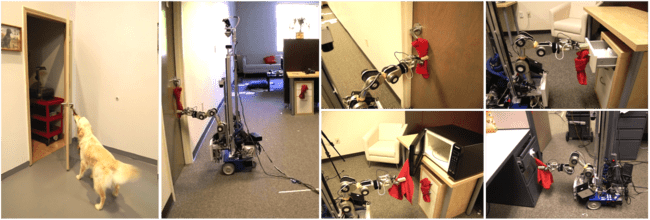
Service animals have successfully provided assistance to thousands of motor-impaired people worldwide. As a step towards the creation of robots that provide comparable assistance, we present a biologically inspired robot system capable of obeying many of the same commands and exploiting the same environmental modifications as service dogs.
A List to Assist
Currently, our robot responds to a subset of the 71 verbal commands listed in the service dog training manual used by Georgia Canines for Independence. In our implementation, the human directs E-lE by giving a verbal command and illuminating a task-relevant location with an off-the-shelf green laser pointer.
Functional Fabric
We also describe a novel and inexpensive way to engineer the environment in order to help assistive robots perform useful tasks with generality and robustness. In particular, we show that by tying or otherwise affixing colored towels to doors and drawers an assistive robot can robustly open these doors and drawers in a manner similar to a service dog. This is analogous to the common practice of tying bandannas or handkerchiefs to door handles and drawer handles in order to enable service dogs to operate them. This method has the advantage of simplifying both the perception and physical interaction required to perform the task. It also enables the robot to use the same small set of behaviors to perform a variety of tasks across distinct doors and drawers.